Archives For Reviews

Grip 2 Damper Review

May 14, 2019

Ever since riding a Fox Fork starting in 2013, I was hooked. Back then, I was on a Fox 40 with the RC2 damper. This was before the air spring came out, so it still had a titanium spring keeping me up. I was amazed with the support and how much it was able to keep me up in the travel, yet still being smooth. I had previously been riding a couple different Marzochi 888 forks, which were really good and ahead of their time when they were new, but I could definitely tell a huge difference in weight of the two forks, even though they were both coil. In 2014, the air version came out and things kept on improving, getting lighter and smoother. Fast forward to mid 2018, the new Grip 2 Damper became available to me, and I was so excited to see what it was all about.

Visually, the forks aren’t that much different, until you start to look a bit closer. The high and low speed compression dials at the top of the fork have been visually updated, but still provide the same function. Some might notice the rebound cap is a bit longer than usual. This is to make room for a high speed rebound adjustment, in addition to the low speed adjuster, which we are all used to.

My experience with the Grip 2 damper were limited to a Fox 36 at first, but now I have it on both my DH and Enduro bike and I couldn’t be more impressed with the swap from my 2016 40 with that year of RC2 damper to the Grip2.

There are a lot of other reviews and videos about the actual technology change and the build of the Grip2 Damper, so I won’t focus on that. I’ll focus on my riding/racing impressions, how I set it up, and what settings I’ve found to work well for the different types of riding I do.

Here is Fox Explaining the technology behind the new damper.

First Impressions:

After installing the fork on my Rocky Mountain Instinct BC, I started riding up to Mt. Fromme from home. On the flat road right outside the house, I noticed that the fork would bob through its travel just my pedal stroke. I have never never experienced that from any fork, even some Rockshox forks, which are known for being super smooth. Even at the (much) higher air pressures than recommended for my weight that I like to run, the fork is so sensitive through the beginning of the travel that it cycles even while pedaling casually along a flat road. I was amazed and slightly nervous that it may not have had the support that Fox is so well known for. Boy was I ever wrong.

After a few rides of dialling it in and playing around with air pressure and compression settings, I settled on 8PSI higher than on my fork with the RCT damper and 5-8 more clicks of high speed compression to get the right balance of support and suppleness. The high speed rebound adjustment took a little longer to figure out what was best for me.

I’ve seen/heard a few riders say that they don’t find much difference in the feeling of the fork when they adjust the high speed rebound. There are 8 clicks of adjustment for the HSR, less than LSR, but I found that it was all I needed. It did take longer for me to figure out what exactly I was adjusting and how it changed how the fork behaved on the trail. Simply cycling the fork through it’s travel at stand still will not help you figure out how you should set the HSR. I actually spent a full day in the bike park just dialling in both high and low speed rebound to where I liked it.

The fact that I thought maybe fork wouldn’t be as supportive as the previous damper was foolish, and I was instantly relieved and a little bit surprised that a fork could have such good small bump sensitivity and be able to hold me up nice and high through brake bumps and under braking.


Longer Term:

I’ve had the fork for around 9 months now and I haven’t had any reliability issues. A lot more other people now have the fork and I haven’t heard of anybody having issues out of the box so far. I’ve been continually adjusting my pressure and compression settings to adapt to different terrain and riding styles throughout the 9 months, and I couldn’t be happier with how the fork has been performing. Lower oil services are just as easy before, the only difference being it uses a 5wt oil that’s teflon infused for the new damper on the damper side fork leg. The air side still uses 20wt Gold oil.


In this little “series”, I’ll be writing about the things I wish I had known when I was first getting into racing. I have 5 years experience racing and now am at a fairly high level and have learned a lot over the years of racing, and 10 years of enthusiastic riding before that.

Topic #1: Spend your money on your bike wisely

We can get carried away looking at all the new technology, components, and design of bikes. Unlike skiing, snowboarding or other extreme sports, mountain biking allows us to nerd out a lot more on our equipment. Modern mountain bikes and their components are very complicated and sophisticated. We all aren’t made of money, and there are some things that are worth spending money on over others when on a budget.

The top 3 component that I would spend more money on when you’re first starting out would be Brakes, Suspension, and Tires over Carbon frames/components, Expensive hubs/wheels, or top of the line Drivetrain.  This doesn’t mean that you have to get the top of the line product, but it is worth spending more money on them to get a better product that works for you and your strengths, rather than cheeping out.

Brakes over Drivetrain:

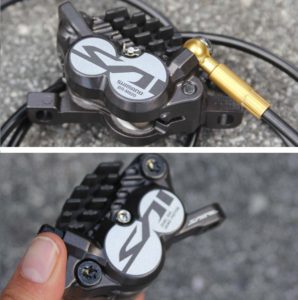
Brakes are obviously important, you can’t go fast with bad brakes. Does this mean you have to spend $400 a piece for brand new Saint or Magura stoppers? No, but when on a budget, or buying a budget bike, brakes are something that you may want to consider upgrading if you’re serious about going fast. My choice for the best budget brakes are Shimanio Zee Brakes. You can find them new anywhere between $100-$150 new per wheel. $300 is still a lot to spend on brakes, so if that’s still too much, then I’d take a look on Pinkbike for a set of used ones. The top of the line Shimano brakes, Saints, can be up to twice as much, and honestly, don’t give you twice as much performance. The main difference between the two being the adjustment, build quality, and weight of the brake lever. You can read the review I wrote comparing the two back in 2013 here.


A lot of bikes are still coming stock with Sram Guide brakes, and unless you’re a small or a very light rider, I would stay faaaaaar away. These may feel good in the parking lot and on the first couple of rides, but the pain and frustration they will soon cause you isn’t worth it. If you want more modulation than Shimano (think of a dimmer switch as opposed to a flick on and off switch), Avid Code brakes are a very good upgrade to the Guides. Sram has also come out with their version of the Code, but I haven’t ridden that one yet. I can only assume it will be as good if not better than the Avid version. Unfortunately, these are the top of the line brakes from Sram and Sram isn’t known for being very cost effective, so Codes are going to cost you more money.

If you’re racing DH, I would stay away from the Shimano 2 piston brakes (XT, SLX, Deore) unless you are small or very light. They simply don’t have the consistency in power over time on steep race tracks and will fade much quicker than the 4 piston brakes. For Enduro racers, XT or SLX would still be good enough, but Enduro courses are getting harder and harder, so if you’re on the taller/heavier side, I would still recommend the Shimano Zee or the new 4 Piston XT. Shimano brakes are designed so that any lever (from Deore to XTR) will be compatible with any calliper. This is an advantage because if you break your Zee brake lever, you can replace it with an XT or SLX off your trail bike.

Your drivetrain is inarguably important. In DH racing you need quick precise gear changes for maximum acceleration out of the start gate and on flatter sections of track. For Enduro racing you need a wide enough range of gears and something that will be easily repairable or adjustable if you have a run in with a rock. Most modern bikes come with decent drivetrains, even on the cheaper end of builds. If it’s running well, no need to upgrade. There is little performance gained for money spent compared to brakes. On my own DH bike, I’m currently using a Shimano Saint drivetrain, which is top of the line, but I have used and been just as happy with the Zee derailleurs and cranks. Same goes the Sram. I didn’t notice much of a difference between the XO1 DH and the more budget GX Drivetrain. On the Enduro side, I use a Shimano XT drivetrain, but carry a spare SLX derailleur with me for race trips because it’s cheaper than carrying a spare XT. XTR is simply way too expensive and the only advantage you get is lower weight (Before the new 12 speed came out). In fact, I found the 11 speed XTR Derailleur pretty finicky and more sensitive to thrashing and needing more adjustment more often to get it perfect. The 11 speed XT/SLX just works, and is much cheaper than XTR. For Sram, I haven’t had much experience with the XO1 or XX1 Eagle, but on the few rides with the NX or GX setup, I have mixed feelings. Sure, 12 speed is awesome and the range is huge, but if something is the slightest bit off in adjustment, you get some skipping. Maybe I’ve just had bad luck and ridden poorly adjusted derailleurs.

In conclusion, when choosing components to upgrade on your bike, I would prioritize brakes over drivetrain. Even on the cheaper drivetrains, if adjusted and maintained properly, they will get you to the top and the bottom of the hill without issue and are less important in racing than good strong brakes, in my opinion.

Suspension over Carbon Frames/Components

Now that you’ve got some good stopping power and your drivetrain is running smoothly, you’ve saved up enough for some more upgrades. Before you get all googly eyed over the latest and greatest carbon components/frames, take a step back and think about performance. Will carbon cranks or handelbars help you go faster than a fresh rebuild or upgraded damper on a fork/shock? Same thing with carbon vs aluminum frames. I would rather buy an aluminum frame with a higher components spec than a carbon frame with a lower build spec for a same/similar price. Sure, aluminum is heavier and doesn’t look as clean, but it is more durable, forgiving, and cheaper than carbon.

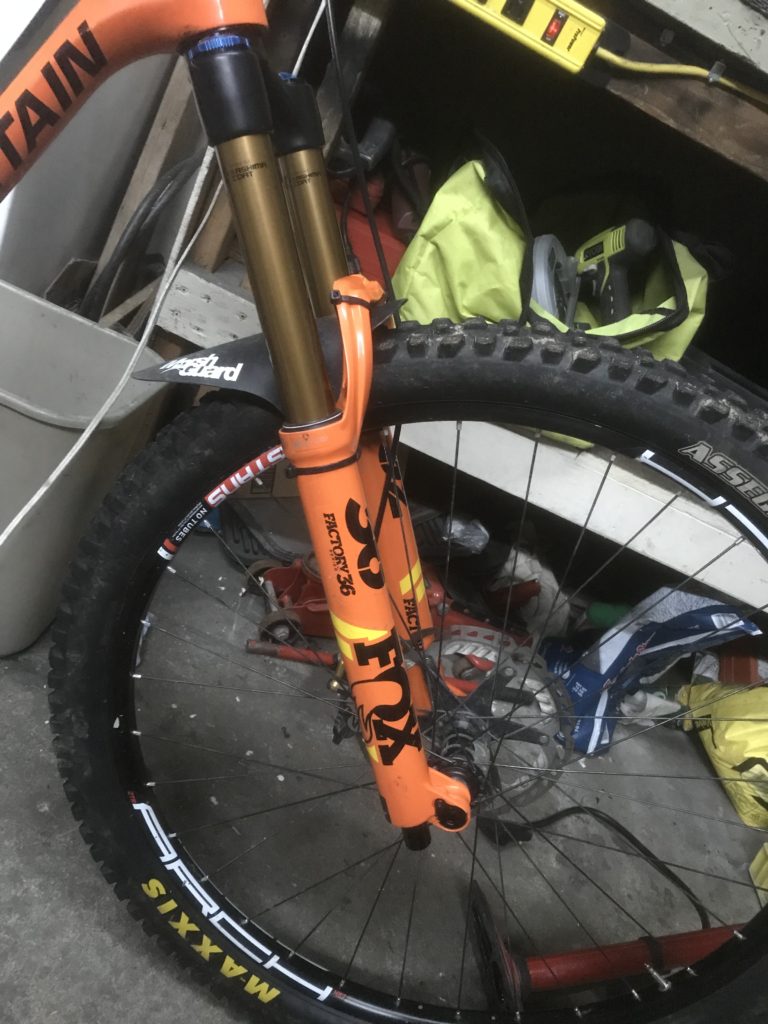
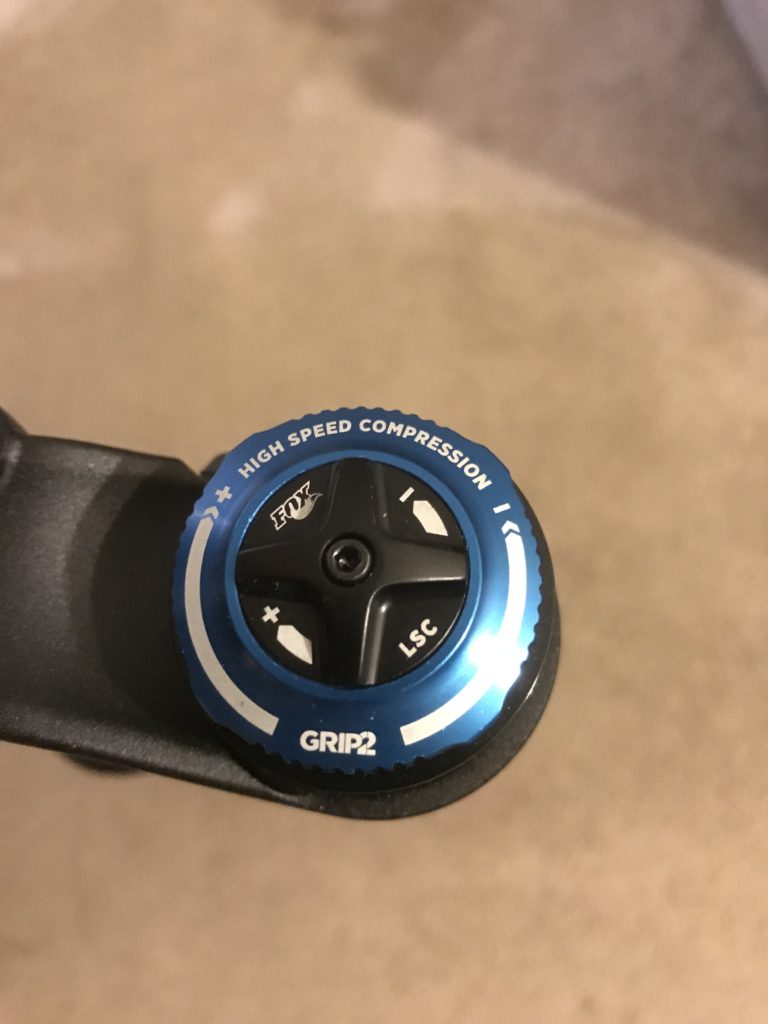
Most low-mid or even higher spec bikes don’t come with top of the line dampers or suspension. Even on bikes DH that are one step below the highest spec model, it still may come with a coil sprung fork and a budget damper. If you do it quick enough, you can upgrade these forks to an air spring which allows for more adjustment using air pressure and volume spacers. If you wait too long before the upgrade, the spring rattles inside the stansion and make it incapable of holding air. My Rocky Mountain Maiden came with a Fox 40 Performance series fork, which was very smooth and worked very well overall, but I wanted the advantages that came with an air spring. Fortunately I caught it quick enough and was able to get in converted to air before the coil spring damaged the inside of the stansion. My brother ended up liking the all black fork, which went well on his bike and we traded, so I ended up with a Factory series Fox 40, Kashima and all. This fork also had a RC2 damper, which has high and low speed compression adjustment, which the performance series didn’t have. This was also crucial for me because I like a fork that stays quick high in it’s travel and doesn’t dive too much, which I can control using the high and low speed compression. My experience with Rockshox forks was the same. The bikes came with coil sprung forks, which we upgraded to air spring and that allowed for more adjustment and a better overall feel. For lighter riders, coil springs up front may be an advantage. On fork air pressure charts, there isn’t usually a recommended pressure for someone under 130lbs.

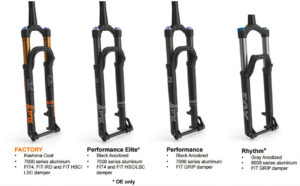
Factory Series vs Performance Series Forks

Tires over Hubs

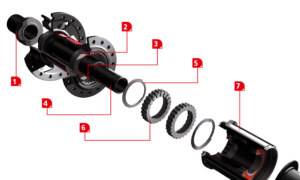
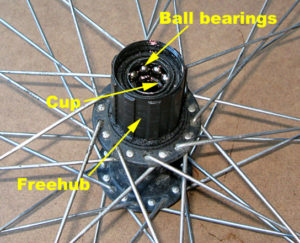
Tires are arguably one of the most important component on your bike. It being the only contact point with the ground. Everybody has unique riding styles and technique so I’m not going to try to tell you which tires you should use. Unfortunately, tires are extremely expensive, almost as much as some car tires, and during race season, may only last a week or two. Hubs are also important, but I think people can get distracted by engagement degrees, sounds, and fancy colors that they now come in. In my opinion, I don’t think a lot of money should be spend on front hubs. As long as they roll well, aren’t loose, or require constant adjustment, there isn’t need to spend a lot of money for a brand new super fancy front hub. Rear hubs are a bit more important. I have broken a few rear hub axles in the past couple years, but it doesn’t mean you have to buy a DT Swiss 240 with the upgraded 48T engagement teeth. My personal favorite is the DT Swiss 350. It’s still a bit expensive, but other than the freehub bodies being a little soft, I’ve never had any issues. They have different cups that you can use to convert them from 150mm-157mm or 135mm-142mm. It’s easy to grease or disassemble if you need to get a stick or something out of your cassette, and I’ve never had any failures. The fastest rolling hubs would be from Shimano. Because they use a loose ball bearing system, they roll extremely fast. The downside to this system is that it needs to be serviced frequently to maintain the smooth performance. The service procedure isn’t particularly hard, but its annoying and finicky. Not something you want to be doing in a dusty parking lot on Saturday night. By frequently I mean every week in some cases. XT Usually last a bit longer before needing a service, but the Saint hubs need a lot of attention to be kept rolling smoothly.

Sealed Bearing Hub

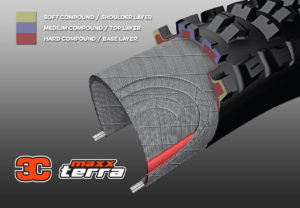
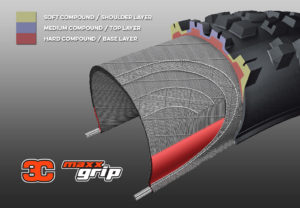
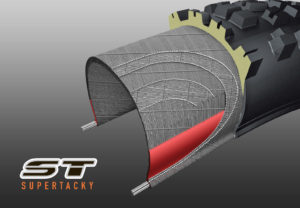
There are different tire compounds for different applications. For the sake of this article, I’m going to be talking about Maxxis tires, since they are the most common and I have the most experience with them. For every day training and practices at races, I recommend using a tire with a harder compound. Maxxis has 3 main tire different compounds for MTB Tires. 3C Maxx Terra, 3C Maxx Grip, and Super Tacky. 3C Maxx Terra uses 3 different tire compounds starting with the soft compound on the corner knobs, a medium compound on the center knobs, and a hard compound in the last layer. You get a tire that lasts quite a long time during normal race. 3C Maxx Grip still uses 3 different compounds, but the softer compounds makes up a larger amount of the tread compared to the harder compound. This will cause it to wear out quicker than the MaxxTerra. Super Tacky has the softest material throughout the whole tread of the tire, meaning it will wear out super quickly, but also give you the best grip throughout the lift of the tire. Schwalbe has a similar range of compound build up called Addix.

You may be thinking that the Super Tacky will be the best tire to use for racing. This could be true for certain tires, but you need to take in consideration that the softest material may have the best grip, but it will also be the most pliable and flexible. I realized this the hard way when I bought a Super Tacky tire and mounted it up and used it on a local race which I had practiced on earlier on a 3C Maxx Terra tire. On the harder packed corner, the side knobs folded due to the super soft compound and I found myself sliding around a lot due to this. For tires with taller side or middle knobs, you may want to consider the 3C Maxx Grip compound if there are a lot of hard pack corners. In super muddy or loose conditions, the Super Tacky will work just fine, but for hard pack, Maxx Grip may be the way to go. The harder compounds deeper in the tread may help prevent the side knobs from folding over as much in the hard pack corners.


Stay tuned for more tips and advice!


Last year after I started racing enduro and saw a few other people using them I researched and ended purchasing a Garmin Edge 520. It’s a device that you attach to your handlebar that tracks distance, speed, elevation, and more data like that. The device is usually used by road bikers, and there are plenty of general overviews and reviews of them out there, but I’m going to be talking more about the MTB use of the device and what I use it for to become fitter and faster.

The device in general is well made, waterproof, and easy to use. I have had to get one replaced because I put it on the front of my seat post on my DH bike, which I hung up on a stand at the Whistler Bike Park and ended up damaging the screen. Fortunately they have a crash replacement deal where you send in your damaged one and for $100 they’ll send you back a refurbished one. A whole lot better than having to buy a brand new device! The screen is definitely the weak point on the device. I have seen many damaged due to relatively low impacts and they do scratch very easily.

There are so many different data fields that you can record and have show up on your screen. You can customize everything and put it where you want it to go as well as individually chose what system of measurement you want each field to display. If you want your distance in Metric and your elevation in Standard, you can do it. I chose to display Distance, Elapsed time, Speed, Time of Day, Temperature, Heart Rate, Calories Burned, Total Accent and Elevation in that order. That isn’t a random choice of data fields, each one is chosen to give me the information I need to make choices in the way I’m riding.

During the EWS race in Chile, they provided the distance, elevation, and elevation gain for each stage and liaison. On the longest one that was the most exposed, I was able to gauge my pace, water, and food because I knew exactly how far away I was and how much further and higher I needed to go before the feed station. Temperature is probably the least important field, I just like bragging about how hot it was during a ride.

You can upload maps to help you get around just by using the device, but I haven’t used that feature yet. I think it would be really useful for road riders who are riding in new areas of town, but I don’t do that often enough to use the feature. You can also do that using Trailforks for mountain bikers. Maybe one day I’ll be surprised and wonder why I haven’t tried it out yet. There are also options to display and record things like Power output, Total Decent, Direction, and others things like that which I’ve tried using, but didn’t see them useful for what I need during racing. Cadence is something that is helpful during training so I can get used to pedaling at a certain speed so that when I’m racing it just comes naturally. Unfortunately the Cadence sensor doesn’t fit on my mountain bike, only my road bike.

Even though I got the device with a Sportchek discount, it wasn’t exactly cheap. The watch I have is able to record Heart Rate, Distance, Speed, and will show you a map of where you went with elevation after you upload it to the app, but I wanted something that I could easily see during a hard ride. Plus the battery wouldn’t last long using the GPS on my watch, where as I’ve never ran out of battery on the Garmin even during 8 hour rides using all the features. The benefits outweighed the cost of the device, in my opinion and I didn’t regret the purchase.

Another reason why I take it on every ride is that it directly records and uploads your ride to Strava where you can compare you times to your previous attempts at the same trail or segment and to other peoples times. Sure you can also use your phone, but during a long ride, using the GPS tracker can really cut down the battery life. Some people make fun of Strava, but as you may have read on my How Strava Helps Me Go Faster post last year, using it can be beneficial.

If you’re a strategic racer/rider like me and like knowing how much further or higher it is to the next feed station during a hot hard race, I would recommend this device. If you like to log your rides, it’s easy to connect the device to Strava and automatically upload your rides so that you can see how fast you were that day without eating through your phone battery. The only problem I have with using the Garmin is that I haven’t quite gotten used to electronics mixing with mountain bikes, and have forgotten it on the charger at home during the EWS race in Columbia. I also had lost it the day before the EWS race in Whistler and definitely could have use the information that it provides to better gauge my effort on the steep liaisons. Those aren’t problems with the device itself, more with the dork who’s trying to use it.

Scrolling through Pinkbike recently, I came across one of the “Ask Pinkbike” articles where a editor or writer from Pinkbike choses questions asked in the forums and answers it in detail. The questions chosen are mostly about technical issues or someone is asking which component/setup/bike would be best for their situation. While reading a particular question about a person having dropper post issues, I saw something which I’ve seen a few times from similar questions. The last line of the question, after explaining the problem is “…or should I just buy a Reverb?”.

The Rockshox Reverb introduced in 2010 was one of the first dropper post available for mountain bikes. It wasn’t the first ever, but definitely became the most popular in the early days of dropper posts. It was popular because of its smooth action and functionality in most climates compared to other dropper posts on the market. Eight years later, in 2018, there are a lot more options.


As a mechanic for Endless Biking, I get the chance to work on a lot of different bikes and a lot of different components and since we rent out high end mountain bikes we are continually updating our rental fleet. Fox is one of the sponsors of Endless Biking, so for the most part we use Fox Transfer dropper posts. However, last year, we got some bikes in before our shipment of Fox posts so we had to run the dropper posts they came with until we got in our Kashima Coated beauties.

Wicklow, Ireland. Photo by Matt Wragg.

Since I am primarily a Downhill racer and have recently gotten into Enduro racing, I have only been personally experimenting with dropper posts for the past 3-4 years. But, when you factor in my exposure to a wide assortment of components at Endless Biking and the continual personal testing of my bike setup in daily training and frequent racing I have a really good sense of how well components work. My first trail/enduro bike back in 2015 came with the KS LEV. I never had any problems with that simple dropper post. The lever felt good, the seat didn’t come up too fast or too slow, and it never sagged or had to be filled with air. My next trail/enduro bike came with another KS post, but I wasn’t very happy with this one. It was a cheaper model, so the lever felt much cheaper and the seat came up too slow. I swapped it out with a Specialized Command post, which was better. It came up a lot quicker and the lever was better quality, but it had issues holding air so I had to fill it with air every 2nd or 3rd day or else it wouldn’t come up all the way, or at all. This annoyed me and I ended up not filling it up and just pulling it up manually every time I needed it. Not ideal.

Last year, my Enduro bike came with a RockShox Reverb. I was optimistic because of their reputation and excited to have an actual working dropper post after growing tired of either having to fill up the Command post or manually pulling up the post for climbs. I had heard from other riders and mechanics who had regularly used the Reverb that you shouldn’t hang the bike by the seat when the post is all the way down. Doing so would introduce air into the hydraulic actuation of the post and over time, cause sag when the post was all the way up. I was careful not to do this the entire time I used the post, and was able to avoid sagging.

At Endless Biking, we weren’t so lucky with the Reverbs that came on some of the rental bikes. It didn’t take long for the Reverbs on the rental bikes to start having problems and the posts were coming up very slowly, even with the speed set to the highest setting. Most of the bikes that had the Reverb posts came with bleed kits, so I started bleeding the posts which seemed to fix the problem temporarily. Unfortunately, the natural place to pick up a bike to put it in the back of the car, truck, or bike rack, is to grab it by the stem/bar, and the seat or seat post.

Most of our customers weren’t aware of the issues with the Reverb and ended up lifting the bikes by the seat and extending the seat post without pressing the lever, which caused air to get into the internal hydraulic system. Unfortunately, this couldn’t be fixed by just a simple bleed. By the time we started warning people to not lift the bike by the seat while the seat post was down, it was too late and it didn’t take long before all of the Reverbs in the shop were sagging and were extremely slow to come up. Fortunately, this was covered by warranty, so before we sold the bikes at the end of the season with all the stock components, all the posts were sent back to get serviced.

My Reverb post was having a different issue. Even though I had remembered to never lift my bike by the seat while the Reverb was on, I still had issues with the post. If it was cold, the post would come up a slowly and even in average temperature the post didn’t operate smoothly. After a few months of use, it became very sticky and rough going up and down. This was especially frustrating when I was in a race where I had my seat up for a long climb and wanted to get it out of the way quickly for a decent. I had to put a lot of effort in to make the seat go down, sometimes having to slam my butt down on the seat to get it to budge. I tried bleeding it, using various kinds of lube and grease, but nothing worked. I ended up sending it back for warranty as soon as I could, right after getting my Fox Transfer post.

I’ve been using the same Transfer post for almost a year now, and I have had no issues. Even in the extreme temperatures, hot or cold (below 0), it has worked flawlessly. As a Pro racer I spend more time on my bike in a month than the average rider spends in a whole season and the Transfer continues to work like it was new. The only reason I’ve had to service it was the bottom piece was broken off in my bike bag on the flight home from a race in Columbia and you couldn’t replace the part without disassembling the whole post. Thanks, United Airlines…

This leaves me wondering why people would pay $400+ for a dropper post that, even if you follow all of the do and do-not’s, might have to be sent back for warranty before the season is over. RockShox recently came out with a new lever, which is more of a 2X style lever instead of the button style that they originally come with which is a bit of an upgrade but it doesn’t solve the sag and reliability issues. Granted, some people have no choice because the Reverb comes on a lot of different bikes as part of the build kit, but when looking to upgrade or building up a bike from scratch, some people still chose the Reverb. I don’t mean to bash the RockShox Reverb and acknowledge that dropper posts are a relatively new and complicated technology with many companies still improving their design. After using the Reverb personally and seeing how it stood up to the demands of professional use and also seeing how it stood up to use in our rental fleet I cannot confirm the Reverb’s reputation and will not recommend it even for the more limited use of an average rider. This isn’t the only dropper post I can not recommend.

Another dropper post that came on some of our rental bikes that we had issues with was the RaceFace Turbine. These posts were extremely finicky to setup and if one little thing was off in the installation, the posts wouldn’t work. We had to send back a couple that had warranty issues right out of the box, but eventually we figured out how to get them to be reliable enough on the rental bikes. Fortunately, these dropper posts weren’t on the rental bikes long and as soon as the Transfer posts came in they were installed on all the bikes.

The only issue we’ve been having with Transfers are that people are over tightening the seat clamps when adjusting the seats which can cause the post not to fully extend.  If tightened too much, a groove will form in the shaft of the post. I assume this would also be the case with any other types of dropper post, but I haven’t seen it, so maybe it’s best not to make assumptions.

This season, a few of our bikes came with another RaceFace post, the Aeffect, which looks to have a much better mechanism at the bottom of the post, than the Turbine. I guess we’ll see how they work when it comes time to put them on the bikes to sell at the end of the year, but for now, Transfers are my choice for the most reliable and easy to use dropper post! Perhaps, now the questions should be… should I just buy a Transfer?


One Up EDC+Pump Update

June 9, 2018

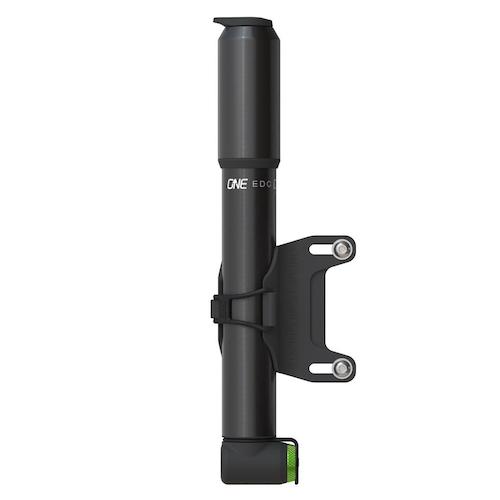
After almost a year of use, It’s time for a long term update for the One Up EDC Tool. After I got back from my trip to South America where I broke the mount for my hand pump that attached the pump to my bike, I started looking around for a new hand pump to attach to my bike. The pump itself was also starting to wear out, it being our only pump that Anthony and I took on our trip, it got used a lot to up the tire pressure before rides, fix flats, and even seat multiple tubeless tires.

I went to Obsession: Bikes, my local shop and they had some One Up pumps. After enjoying my EDC tool, I was interested to see if their hand pump would surprise me again with lots of features.

Generally, hand pumps are a last resort and most are built that way. Some only work long enough to fix a couple flat tires, then falling apart or not building enough pressure to fully inflate a tube. The One Up pump however, is not like other pumps.

The pump comes in two different sizes, 100cc and 70cc, cc being the volume of air per pump. They both have some nifty features that most other pumps do not. Both can hold the One Up EDC Tool, and the 100cc pump, which is longer, can hold the tool a CO2 screwed in the bottom, with the 70cc version only being able to hold the EDC tool, or a CO2 due to the shorter length. The pumps have a removable tip that will screw onto a CO2 cartridge to quickly fill up a tire/tube. Both are able to be mounted to the bottle cage mounts on your bike.

I got the 100cc pump because I’m not overly concerned about the insignificant more weight or the slightly longer size of the pump, and you get 30% more air in per pump. I definitely could tell how much difference the extra volume made when I had to use it to fix flat tires compared to other hand pumps that I’ve used. There wasn’t any lever that you have to flip to get the pump to lock on to the presta valve, just push it on and start pumping. I also like how you can carry your CO2 inside the end of the pump, where you can also fit the EDC tool.

I don’t have any really bad to say about the functions of the pump itself, most of my issues started happening when I put the tool inside the pump. One thing that I have very minor issues with is that to used the CO2 adaptor, you need to unscrew it from the head of the pump and then screw the CO2 on. It works fine, but can take some time. If you’re not racing, this wouldn’t really be an issue, but if you’re in a very long enduro stage and puncture a tire, every second counts and there are other adaptors out there that are much quicker to use. The pump only works on presta valves, and with pretty much all newer bikes, and all tubeless setups being presta, this hasn’t been an issue for me or anybody that I’ve come across who’s needed a pump. If you’re using tubes with schreader valves, this pump is unfortunately not for you.

After getting a new fork and not having the tap to put my EDC tool in the steertube, I put it in the pump for a while until I could borrow a tap. I wasn’t really that happy using the pump and the tool in this configuration though. To be able to get the tool out, I always had to take the pump out the holder due to the very tight seal that the oring on the tool had to keep it from popping out of the pump/steertube. To get it back in, I sometimes had use a lot of force to push the bottom of the tool against a hard object to get the tool to lock into the pump. I guess is a bit of a smaller problem if you don’t have to use the tool that often, but I think it’s worth mentioning since a big part of why I got the tool was easy and quick access. I also experienced the end of the pump extending and rattling against my frame when the extra weight of the tool pulled it out of the seal that kept the two moving parts together durning stowage. This only really happened on faster rough trails, but was pretty annoying, and enough for me to suggest people don’t carry their EDC tool in this configuration. Without the EDC tool in carried in the pump, this has yet to happen, even during racing.

The only structural issue I have with the pump isn’t even on the pump really. The elastic retaining strap that locks in the pump to the mount broke on me. surprisingly the pump hasn’t fallen out yet, so the mount itself has enough strength to hold the pump in place so far.

It seems like there are a lot more negative things than positive, but that’s not true when I’m talking about the pump itself. The pump itself has exceeded all other pumps I’ve used in performance and reliability so far. I have not attempted to seat a tubeless tire with it yet, but I wouldn’t be surprised if it worked without too much effort. I’m not a big fan of carrying the EDC tool inside the pump, mostly for accessibility of the tool. I know other people who carry the tools inside their pumps and don’t have issues with the end of the pump coming loose and rattling against the frame, so maybe I just got a loose seal or something. Overall, I would recommend the One Up EDC Pump to use as a hand pump to keep on your frame on in your bag, that can also carry a CO2 in the storage compartment for quicker repairs.

One Up EDC Review

January 12, 2018

In my opinion, every mountain biker should carry some sort of multitool with them to be able to deal with minor adjustments or problems on a ride. For me personally, whether it was the early days with a full camel back with almost every full size tool imaginable to more recently having a tiny 3″ by 3″ tool in my pocket, I have always struggled with carrying or remembering to carry tools with me on my rides. That is, until now…

As soon as it came out, I thought that the One Up EDC tool was a very innovative way to carry a tool for a ride. My main problem recently is that I often forget to slide my little Crankbrothers multitool into my pocket while i’m in a rush to get out on the trails. I wanted something that was always with me that I wouldn’t have to remember. There are a few other options for these kinds of tool systems, Specialized SWAT being one of them. I would have bought one of the SWAT water bottle cages with the multitool attached to the bottom of the cage if it had been in stock in my local bike shop. In some ways, I’m glad it wasn’t in stock because then I probably wouldn’t have bought the EDC tool as the alternative.

The tool has almost everything you would need for a minor trailside repair. 2mm-8mm allen key, T25 Torex, one tire lever, chain break, Flat head screw driver, all size of spoke keys, spare chainring bolt, and storage for a very small CO2 canister, or anything else you can fit in the little tube that screws into the bottom of the main tool compartment. The allen keys are obviously shorter than your average multitool keys, but not shorter than any other similar compact tool. The leverage is actually better than my compact Crankbrothers multitool that I used to carry in my pocket. The tool itself is long enough to get a good grip on it, but small enough to get in all the difficult to reach bolts that you may have to tighten or adjust. The tool has a special key to be able to tighten the specific One Up top cap for the steertube if you chose to go that route, which is something very important that could be overlooked. I’ve had to use the tire lever, and it is indeed strong enough to get a DH casing tire off a rim Stans Rim.

One concern I have is that to achieve an 8mm key, you have to combine the 5mm key and the flat head screw driver. I’m not sure if using it in this way would be strong enough to loosen say a tight pedal or a main pivot bolt which would normally be an 8mm key, but I guess I’ll have to find that out when the time comes. Right after I purchased this tool, I had to replace my chain. I thought this would be a good opportunity to try out the chain break to see how it worked so I wouldn’t have to figure it out in the middle of a ride. I actually had to google search how to use it because I couldn’t figure it out. As it turns out, you have to bend the chain so it’s at at least a 90 degree angle to be able to get the pin out/in. This is one negative that I have against the tool. Having the bend the chain in that way would be extremely difficult when you’re alone on the side of the trail trying to get a new chain pin in. The solution to that would be a quick connect, which the tool has space for built into the housing. This is a great addition to the tool, my only complaint with it is that the quick connect easily falls out of the housing. After experiencing this, and luckily finding the quick connect link, I easily remedied it with a small strip of tape over the quick connect.

8mm key

Using the chain break out in the field could be a little tricky.

Little piece of electrical tape over the quick links

The tool can be used in a couple different configurations most common being inside the steer tube of the fork. This requires you to buy a tap kit, remove the star nut from your fork, and tap threads into your steer tube to be able to tighten down the new cap which holds the tool at the top of the steertube. One Up says that the tap can only be used three times, but I’m pretty sure the one I borrowed was used more than three times and it works just fine. I would recommend asking around before purchasing a tap kit. One thing I don’t like about using the tool in this configuration is that it decreases the potential height of your bar/stem. I had put all four headset spacers under my stem to increase my bar height, but tapping threads and storing the EDC tool didn’t allow me to have my stem/bars as high as I would have preferred. I wasn’t too concerned about this because I purchased this tool in the fall, and I  knew I would be getting a new bike/fork in the spring so I could account for that when it came time to tap threads into the new fork.

Tapping threads into your steertube is a lot easier than I would have thought. Make sure to use lots of Triflow!


With One Up cap screwed into the newly tapped threads

The second way to use the EDC tool is to purchase one of One Up’s pumps. Looking back on it now, this is the way I should have gone. My thinking was, I already have a good pump that Is attached to my bike, so why spend the money on another pump? The One Up pump I found out, is not a normal pump, however. It also has a CO2 cartridge adapter so if you’re in a hurry, you can just use a CO2 to inflate the tire instead of using the pump. Using the pump configuration, you don’t have to tap threads into your steer tube, altering your potential stem/bar height and you eliminate the ability to use certain Garmin or other computer/video mounts that go directly on top of your steer tube.

The One Up EDC tool is a great solution for people like me who like to be prepared for a trailside repair or adjustment, but don’t always remember to put a tool in their pocket. It’s not overly expensive, especially compared to other similar products, has mostly everything you’d need in an emergency, and can be carried in two unique configurations that you wouldn’t usually have to worry about forgetting when you’re on a rush to go for a ride. Like anything, it’s not perfect. I could see the chain break being a little difficult to use on somebody’s bike who doesn’t use a quick connect, the lack of a Phillips head screw diver for a cable or other derailleur adjustment, the uncertainty of how the 8mm key would fair against a tight pedal or main pivot bolt, and I have recently noticed that the tool has begun to rust. It is Vancouver in the winter, with all the wet conditions and constant washing of the bike, I should have expected and taken steps to prevent this. These are little details which, in my opinion wouldn’t make or break the tool, they are just something to keep and mind and be prepared for.

Little bit of rust in the corner of the tool and on the chain break pin.


Polar A300

October 25, 2015

You may remember that a little while ago I did a post about experimenting with a Fitbit to help me with recording and analyzing my training. I realized that the Fitbit wasn’t accurate enough, so I did some research and found this device.

A300

I have been using this device for almost a month now, and I am quite happy with it. The battery life is MUCH better than the fitbit. For average users is lasts about a month compared to the fitbit which lasts 5 days. The display screen stays on all the time and while doing activity, you can set it to display your constant heart rate and time, calories burned and heart rate, or the time of day and heart rate. It is easy to use, has accurate heart rate reading, and also has an app where you can look at more depth data of your workout.

The heart rate reading comes from a chest strap that you have to purchase separately. I already had one from a different HR monitor, so I didn’t need to buy a new one. The watch syncs with almost any Polar HR chest strap.

The app isn’t as fun to use, or as in depth as the Fitbit app, but it still works pretty well. One thing I really like is that you can see a chart of your heart rate over time.

IMG_7776


I wear this watch 24/7, even in the pool. It is accurate, does everything I want it to do, and even if the wrist strap broke, you can purchase a replacement one. These are the reasons why I recommend the Polar A300.

Being a long time user of TriFlow made me think why would I ever change to a different chain lube? In the years past, we’ve experimented with other chain lubes and found that they didn’t really didn’t provide any significant advantage. Until now…

WPL_Products

Whistler Performance Lubricants is a company that produces high performance and environment friendly lubricants, grease, and suspension fluids. What’s so good about their Chain Boost is that is not only last longer than triflow and other lubes and works well, but it also acts as cleaner after your ride. No need for degreasing your drivetrain! The lube will not wash off when you’re riding through puddles or in the rain, but once you take a hose to it, your drivetrain will look clean as new, and I’m not exaggerating. I was pleasantly surprised when I washed my bike for the first time after using the Chain Boost and having my chain and gears shiny and grime free.

Whistler Performance Lubricants also makes a product called Fork Boost, which you can apply to your fork to make them feel buttery smooth, and to clean out the seals without having to drop the lowers.

Check out their website for instructional videos and more information!

http://www.wploils.com/


A couple weeks ago, I was pretty excited to take my training to another level by purchasing a fitness tracker, the Fitbit Charge HR. It claimed to track your sleep, steps, calories burned, distance, as well as continual heart rate monitoring. I was excited to monitor and improve my training, nutrition, and sleep using this product, and It did most of those things very well, but not all.

Fitbit 2

The Fitbit was really easy and quick to set up. The app works well and has everything you could need, but I found a problem with the tracker itself. While it tracked my steps, sleep and distance traveled accurately, It did not accurately track or display my heart rate.

For everyday use, the heart rate reading was where it should have been, but once I went to the the gym or for a bike ride, the displayed heart rate was sometimes as far as 60 BPM off of my actually heart rate. It seemed to have trouble tracking anything above 140 bpm. I wasn’t the only person to have this problem, as an article was written about the problems with the Fitbit Surge. For the two weeks I had it, it only accurately (or close to) read my heart rate twice, and that was only on my long cardio workouts. It would not accurately track my heart rate in the gym, or when I was on the pump track or doing drills.

What’s so bad about that? Well, other than claiming to track your heart rate during exercise and not doing so, how can a device accurately track your calories burned if it doesn’t track your heart rate during exercise? It basically makes the device useless to me. The two most important features that I want don’t work.

After doing some more looking around, I found an article that stated that Fitbit claimed that the heart rate tracking was good enough for most people. I guess I’m just not most people.

If you’re the average to active person who is looking to be more active, this is a great device to track your sleep and activities, but if you’re a serious athlete, want detailed accuracy and are looking to track EVERYTHING, I do not suggest any of the Fitbit products.

I will be doing more research to find a product that will do everything I need it to do.

If you haven’t noticed by now, the Whistler Bike Park has recently been going though a lot of changes to its trails. At the beginning of the season, before the bike park opened, they announced that they were going to be evolving the bike park to better suit 650B Wheel by slightly adjusting berms and jumps. Great, just what we need, right? Later on, another announcement was made that the jumps on A-Line were going to be made so that they were “easier” for less experienced riders by raising the landing so it’s more visible and getting rid of the blind jumps. After this happened, I was a little bit suspicious of what was going on. As the spring/summer of 2015 went on, I started to notice the destruction of the well known trails.

Last year, the GLC drop was destroyed. What used to be a semi challenging and exhilarating hit that we all looked forward to at the end of a lap, is now a pitiful 3 foot drop/jump that I would have done when I was 8 years old.

Before

Before

GLC 2

After

Crank It Up, which used to be a super fun fast lap that sucked the energy out of you because of all the scrubbing of the short steep lips, is now a trail filled with jumps that are really just rounded bumps, most of which aren’t even worthy of two orange flags. I don’t enjoy riding that trail anymore.

Even the world famous A-Line has been toned down with less kicky jumps, longer, slacker berms, and the shrunken rock drop to accommodate slow and less skillful riders who do not belong on the trail.

Guess what; A-Line wasn’t designed for ever mountain bike rider! Like the rest of society, the Whistler Bike Park is trying to be friendlier not offend the easily offended or weak hearted. A-Line wasn’t designed for the average person, or even intermediate riders. You see that black triangle on the signs? That means ADVANCED riders. Not people who are going to fly 2 feet off the lip, land on top, chuckle to themselves and roll down the backside. Earn your right to ride it by developing your skills on easier trails, then give it go! It seems like riding A-Line is more of a bragging accomplishment more than anything actually being able to successfully clear all the jumps.

I don’t see these lip rollers on Dirt Merchant because if people tried to roll the lips on Dirt Merchant, they would wreck themselves. Does that mean I should stick to Dirt Merchant and leave the slow lane of the highway which is A-Line? No. They are completely different trails. There is no Dirt Merchant race because it wasn’t designed to be ridden beyond a certain speed. The lips of the jumps are way too steep to be ridden at race speed. If you let off the brakes and pedal into the jumps, there is no way to squash them, you will fly 30 feet in the air and land flat or into the lip of the next jump, which I came close to doing on my first lap after they re-built it. I prefer if somebody rides in front of me on Dirt Merchant because if they don’t, I will let off the brakes and overshoot every single jump. There is nothing like the feeling you get at the end of a day doing full speed top to bottom laps on A-Line, and unfortunately, that is becoming harder and harder to do.

I understand that the Bike Park is trying to make the park safer, but do so on trails where people need the safety. Letting and encouraging slow and inexperienced riders on advanced and expert trails is dangerous for us, the riders who the trail was designed for. The people who really belong on those trails.

I can think of at least 3 times this month where I have come full speed into the A-Line rock drop to see a group of “Joeys” gawking at the top of the drop. Fortunately, there were some sensible people in the group who were looking up the trail and able to warn those in the way so that they could get out of the way before I hit them. What if I hadn’t been so lucky? If I hit a human going full speed off of a drop, I will not be able to get up and shake it off and accept apologies. Great damage would come to my body, my bike, and their body. For someone like me, who is trying to make a career out of riding, a blown knee or brain damage is something I would really like to avoid and may ruin my hope and dreams entirely. Does a first time Bike Park rider or a weekend warrior out for an adventure really want to be responsible for, or endure the wrath I would lay on them if this happened?

I have also had multiple times where I come upon a slower rider, who hears me and tries to get out of the way, and end up crashing while trying to get to the top of a berm because they get scared and want to get out of my way as quickly as possible. I don’t want this to happen. The danger goes both ways.

If these inexperienced riders continue to think they can ride advanced trails because they’ve “totally shredded A-Line”, what will happen when they build up confidence and take themselves to Crabapple Hits? I think we all know what would happen. I had to help a kid who hit those jumps a hundred times with no problem down the mountain with two broken legs because he was slightly off position and was sent over the bars. If it had been a Joey, who knows how bad it would have been. Will that happen? Maybe, or maybe not. But if the Whistler Bike Park already is having insurance issues, do they really want to find out?

I have heard, and also speculated that the reason for this modification of “dangerous” features is for insurance reasons. This makes sense, but at the same time is infuriating. This is mountain biking! It’s not a matter of IF you get hurt, it’s WHEN and how badly. The trails crossings and merge points are safe, the wood features are not falling apart, and the big holes in the berms and jumps are quickly repaired. What kind of person would sue a facility because they don’t have enough skill to successfully do what they came there to do? Would sue a rock climbing wall facility because you slip and scrape your knee on a rock because “it’s obviously too small for my foot and I deserve to make it to the top because I am awesome”? No. You signed the waiver, you should have understood that this is an extreme sport which is not meant for everybody to be able to do! If you’re not skilled enough, work on it and get better. Don’t sue a facility because of your inability to accept failure.